One of the tenants of the MSU Hub is “Collective Power.” As a Hub we “leverage, coordinate and scale MSU’s existing energies and creativity by connecting people, designing opportunities and facilitating innovation.”
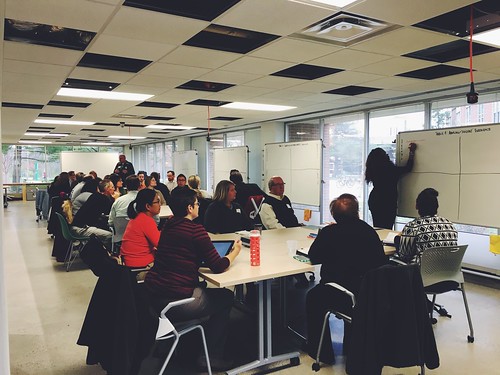
On November 11th, the collective power was summoned to the Hub by gathering campus stakeholders involved in online or hybrid MA & Graduate Certificate/Specialization programs at MSU. This is the first time this group has been intentionally gathered. The purpose of this meeting was to make connections and have guided discussions to share strategies for advising, program development, curriculum development, marketing, economics, program data & reporting and to generate questions and possible innovations to serve our students and programs.
The invitation was intentionally inclusive – we wanted to invite/anyone who would have insight into programs (graduate TAs, administrative assistants, department chairs, etc.) or people who are considering developing online MA or certificate/specialization programs. We did not include current students in this invitation as we were focused on inward facing issues (we plan to include students in the future!) The list of invitations was gathered by researching programs listed here: https://reg.msu.edu/ucc/onlineprograms.aspx
The structured portion of the meeting was kept simple – we divided the participants into 4 tables for a modified SWAT discussion focused on:
SWOT usually stands for Strengths/Weaknesses/Opportunities/Threats – we substituted Tensions for Threats.
A rich (and rapid!) discussion ensued as we had 20 minutes at the first table (then 10 minutes at subsequent tables) to discuss each issue. The groups moved from table to table so everyone had the change to air out their SWOTs.
After the SWOT participants had a chance to network. It was fantastic to see the cross collaboration & discussions happening. I witnessed relief that others were struggling with similar tensions and joy to find immediate solutions to some challenges. Immediate feedback from participants was overwhelmingly positive and appreciative of the chance to simply take time to meet and talk.
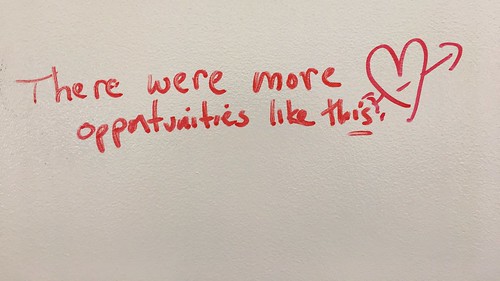
We ended the meeting by using the large whiteboards in the Hub and asked the following:
Did you know ……
I wish we could……
Help!!!!
More connections were made and the following comment in response to I wish made me very happy to have had the opportunity to facilitate the experience:
Looking forward into 2017 – more meetings will be facilitated and small working groups organized to discuss issues surfaced during the SWOT.
Here are a few quick tips to think about as you’re getting online courses ready for fall!
#1 – Use personal videos
If you don’t like the way you look on camera, try to get over it! It will get easier with time. You need to create presence in your online course and a quick and easy way to do so is to fire up your webcam, iPhone or DSLR and get talking. Keep it short. Reiterate a few of the things that are important to you in the course and give the students an idea of who you are and what to expect (more on that in a moment.)
Please use a tripod and focus on production value (I personally prefer Vimeo over YouTube for posting and embedding). A little setting up and thinking through the production goes a long way!
#2 – Tell students what NOT to expect
We spend a lot of time crafting syllabi that tell students what to expect over the semester. Online students in particular come to the course with a set of a priori expectations and assumptions that may not be a part of your course. Now, this is all very vague and takes an experienced online instructor to know these norms, however, there is one easy place to start – and that is with feedback. This is the most important piece I have learned and improved upon over the years. There are unrealistic or undefined expectations in the student-professor relationship when it comes to feedback. Students say they want more, professors think they’re giving it. The problem (I have found) in online classes is that the conditions of feedback are unstated. Once I started to say “You will receive cursory feedback on this, in this format, within this # of days” or “You will NOT be receiving feedback on X, because” things improved dramatically. Students reported high levels of satisfaction with the feedback in end of semester evaluations, even though it hadn’t changed! I was setting realistic expectations.
This is a learning process for me that is under constant evolution. In one course I supervised last semester the TA spent copious amount of time writing incredibly helpful feedback to students in the Google Docs comments. He would pose questions to the students in the feedback, which often went unanswered. Seeing feedback as a dialogue is a wacky idea to many, SO, as an improvement this semester, we are making responding to feedback an explicit part of participation and evaluation.
#3 – Make sure you have clear deadlines and due dates
I unfortunately have seen one to many confusing online courses. In all of the courses I teach, each online unit has a “road map” – this is a simple checklist of what is to be read/watched and what is to be turned in. If you’re not an expert instructional designer, it’s NOT easy to convey this in a CMS or on a syllabus. Make a checklist and everyone is on the same page.
#4 – Clarify communication channels
Be explicit on how you prefer students to contact you (email, tweets, texts, etc) and state your standard turn-around for email. (During the semester I promise a 24-hour turnaround on course questions.) If you’re working with a TA, clarify if students should email both of you, or, if you prefer to have one point of contact.
That’s it – there is so much more, but, these 4 quick tips will give your online course a level up!
Do you have any quick tips and tricks? Would love to hear your thoughts in the comments!
We are excited to announce a new instructional role on Team MAET – Content Curator.
Michelle Schira Hagerman and I were chatting (as we often do!) about all of the great work that is being generated by MAET students. Our Educational Technology Certificate courses run year round – every 8 weeks – with 3 courses running during those 8 weeks. That’s a tremendous amount of content being generated – in just 3 of our courses! Our instructors do a fabulous job providing feedback and support to our students, but, that takes up a lot of time and doesn’t leave much (if any) room for viewing the content with a wide lens, over time. As program directors, Michelle and I keep a close eye on the great work being shared on twitter and other social media, however, we have not had the time to collect and analyze the work as closely as we would like. That’s when it hit me – just like a library, museum or archive – we too need a curator!
This had my mind buzzing – I dug out my Clifford Geerz, Margaret Mead & Caroline Haythornthwaite! The possibilities are endless. In researching, I came across this spectacular resource from The Digital Curation Centre (DCC) in the UK. They have a very comprehensive website filled with tools and how-to guides. They have created this beautiful workflow & visualization for digital curation:
They articulate the following aspects of the curation cycle:
Conceptualise: conceive and plan the creation of digital objects, including data capture methods and storage options. Create: produce digital objects and assign administrative, descriptive, structural and technical archival metadata. Access and use: ensure that designated users can easily access digital objects on a day-to-day basis. Some digital objects may be publicly available, whilst others may be password protected. Appraise and select: evaluate digital objects and select those requiring long-term curation and preservation. Adhere to documented guidance, policies and legal requirements. Dispose: rid systems of digital objects not selected for long-term curation and preservation. Documented guidance, policies and legal requirements may require the secure destruction of these objects. Ingest: transfer digital objects to an archive, trusted digital repository, data centre or similar, again adhering to documented guidance, policies and legal requirements. Preservation action: undertake actions to ensure the long-term preservation and retention of the authoritative nature of digital objects. Reappraise: return digital objects that fail validation procedures for further appraisal and reselection. Store: keep the data in a secure manner as outlined by relevant standards. Access and reuse: ensure that data are accessible to designated users for first time use and reuse. Some material may be publicly available, whilst other data may be password protected. Transform: create new digital objects from the original, for example, by migration into a different form. – See more at: http://www.dcc.ac.uk/digital-curation/what-digital-curation#sthash.wuimWmaX.dpuf
In googling “content curator” you will come across quite a few interesting resources – many of them from the marketing and journalism world. One that struck a connection to the work we’re trying to do is this TED talk from Steven Rosenbaum author of Curation Nation.
MAET is bringing content curation to the classroom – as Rosenbaum articulates in his TED talk – “to bring clarity and connections” to the content generated by our incredible students. Michelle expands on this by saying – “our content curators are curating content that serves an important pedagogical purpose. They’re certainly evaluating and preserving…but also drawing connections among the selected pieces in ways that our instructional team can leverage for important teaching. This is the real power in the curation role. The archive is critical…but the curation also adds value to students’ learning in our online classes. It feeds back into their work by exposing common themes, highlighting exemplary work, and raising questions that emerge within and among courses.”
This is new territory for all of us and we’re very excited to introduce our first MAET Curator Team – Chessi Oetjens, Steven Book, Mary Wever, and Wheatley Davis. Chessi, Steven, Mary and Wheatley will be pioneering and shaping this role over the 2014-2015 academic year. Our initial goals are to collect, connect and amplify. You can watch our experiment grow by following: https://twitter.com/maetcurator
We would love to hear your ideas on the shape and direction of this new initiative. Do you see a place for a curator in the classroom? How would you conceptualize this role in your educational space?
A while ago, Andrea and I wrote “How to Hack it on Twitter.” This is a followup (of sorts) on some of those ideas and food for thought for those thinking of using Twitter in the HigherEd online, hybrid or face to face classroom, specifically at the graduate level. There are lots of guides out there for k12 and undergraduate – I am speaking to the population that I know best!
WHY SHOULD I USE TWITTER?
My mantra has always been to lead by example, I am not out to “convert” everyone to a Twitter user. I have found Twitter invaluable as a resource for teaching and professional development and I would love for my students to experience that as well so they can decide if they want to integrate it into their own personal practice. Specifically in teaching, I find Twitter useful for a backchanel, reading discussion and connection to wider ideas and communities. You can connect with the authors you’re reading and discussing (see Adrienne’s recent tweet) and have public conversations that are not dependent on time and space – these are things that I have not been able to do in a traditional CMS/LMS.
HOW DO I FACILITATE CONVERSATION?
In our face-to-face summer sessions, we use Twitter as a backchannel and have found HootCourse (not to be confused with HootSuite) invaluable for facilitating these conversations. HootCourse is wonderful because it allows you to create a “class” or group & designate your hashtag so anyone who tweets via HootCourse will have their tweet pre-populated with the class hashtag (more on hashtags in a minute.) The other thing I like and appreciate is the fact that HootCourse allows for people who have private Twitter profiles to participate and be seen in class twitter discussions without the rest of the class/group having to follow that person. I respect the privacy of my students and while Twitter works best when public, there are legitimate reasons why some students do not want to participate in the public sphere. This allows them to do so, with out compromising their personal reasons for remaining private.
As a concrete example – Mike and Sean have the students “tweet and read” at night. They’re given prompts like:
Chapter 2 in Sparks (deep read, be thinking about how imagination might be different from creativity). Read and Tweet just this chapter using #maetyr3 and #sg2
While teaching face to face, I have HootCourse & TweetDeck open and between the two tools, I have a fairly good hand on the conversations.
In my online teaching, I currently use Twitter as an informal backchannel and have a close ear to the ground for anything with the #maet hashtag. (I also follow our MAET course codes #CEP810, #CEP811, #CEP 812 and on.)
WHAT HASHTAG SHOULD I USE?
Hashtags are a very important part of using twitter with a group of people – they’re what set your tweets apart from the crowd and allow for easier searching. I always suggest using your course code – generally that’s very unique and means something to your class population. If you want your tweets read by a wider audience, you may want to selectively use other hashtags – SELECTIVELY is the important word here, you will be creating a lot of noise and chatter, all good noise and chatter and relevant to your context, but may not always be relevant to the more popular hashtags. For example, as edtech goes – a conversation or reading my line up with #edchat one week, or we may be doing something relevant to #nwp, #highered, etc. at that time, I would either model this in my own tweets, or, explicitly suggest to students that they use those hashtags to engage in more global conversations.
One other note here for newbies, you cannot control who uses your hashtag – that is the beauty of the open, unregulated twitter-verse. You will want to search the hashtag you’re thinking of using http://twitter.com/search just to make sure there is not another organization or group using that code frequently.
HOW AND WHY SHOULD I ARCHIVE?
Twitter is nebulous – and if you’re a newbie Twitter user yourself, can be tricky if you’re thinking about using it in a “high stakes” way (aka grading anything that happens on Twitter.) Twitter is not self archiving, tweets can disappear, you can miss conversations between students if you’re not following a member of the conversation or if a student forgets to hashtag a conversation. Luckily there are some tools that can help with this. Those that know me know I’m probably the #1 fan of ifttt – you can create some pretty amazing recipes with ifttt & Evernote that will help with archiving.
If you have a small class, this recipe should do the trick:
Specific User Tweets to Evernote http://ifttt.com/recipes/20726
The Archivist is also a very beautiful and handy tool that will allow for data visualization from your archives. The trick here is BE PROACTIVE in your archiving strategy – these tools cannot go back in time, it’s not the way the Twitter search API works.
HOW DO I GRADE TWEETS?
My answer to this one – don’t (for many of the reasons I just listed in the archive section, you may not be seeing everything that happens.) If you have to put a grade on it – blend it in with overall participation. All too often, message boards/posts are graded based on volume (post x many things) rather than quality. I would suggest developing some sort of rubric/scheme around Sliver’s idea of “thick and thin tweets” and have a discussion with your students on how they think participation should be assessed and collectively construct a rubric or set of standards.
This is just the surface! Let’s discuss more in comments – please share your best practice tips, successes & failures!
Here are two excellent questions – one from an MAET Alumna and the other from a current MAET code warrior:
Ms. C’s Question –
Quick Weebly question – I am wondering how I can create a link to a page that is currently a word document. I want to put the link to the course syllabus and other things at the bottom of my page without having to put that title in the main menu.
Answer:
Weebly has gone through some UX (user experience) changes recently and I had to look it up myself! Before googling, I checked the Weebly help. It’s really well done and love the organization! Here’s the answer to your question
Right now I’m looking for a content management system (CMS) to migrate our website to so it would be easier to edit the content by more people other than the web master (me). Maybe you have a good one that you know of.
My response:
Great question – as a former web master I know what a challenge this can be! I finally had time to post this question to Twitter today and the multi-talented Ben Rimes (@techsavvyed) and I tweeted back and forth discussing the issue:
@gravesle – WordPress, Googlesites, or Wikispaces work well for multiple authors. I’ve heard Joomla is nice, but you have to be techie for it
I know that Mr. H is a code-warrior so I tweeted back:
@techsavvyed I’ll pass on the suggestions-he is techy-so joomla may work well – it’s for a school site, something “robust” is preferred thx!
Ben responded:
@gravesle Yeah, then Joomla or even Drupal might work
If it were me, I would probably go with WordPress – just because it’s in my comfort zone and the open-source community around the tool is so strong. I did some googling and found this really nice report comparing Joomla, Drupal and WordPress:
Though it is (admittedly) outdated (all of the softwares have updates, check the author footnote for updates) the document gives you great ideas for what to look for in each of the content management systems and what to consider when choosing what works best for you.
The great thing about these three tools is that they give you an idea of the infinite number of choices you have (CMS Matrix), the ability to choose features that are important to you to consider your options (edutools), then the ability to try them out from an admin and user perspective (opensourcecms) without having to install!
Hope this helps in your search – keep us updated on what you decide to use!!
In an assignment inspired by O’Reilly’s “Developer Notebook” series, I have students create a document in Google Docs and share with the instructor and teaching assistants. The course is titled CEP 820: Teaching K12 Students Online and the final product of this particular assignment is a “Notebook” companion to an online course module they develop over the semester. This notebook is meant to be shared with peers in their particular grade level and subject areas. Since this is an “in process” writing assignment, we chose to use Google Docs over a blog because it allows for frequent revisions, feedback and iterations before polishing and publishing to a wider audience. Google docs has proven to be a great tool for facilitating the feedback and writing process with our online students.
The crux of the O’Reilly developer notebook series is the following:
Example-driven
Aimed at developers
Actually Enjoyable
This is an excellent framework to co-opt for the developer notebook assignment. The products the students create will be usable (and enjoyable) to a wide audience and fill a niche that does not currently exist at that level of specificity. There are many “how-to” create online courses or use course management software books — but very few specific resources for teachers to reference when developing for their own grade level/subject area and CMS of choice. The ultimate goal of the notebook is to have something the students can publish and share with colleagues who are going through a similar development process. We have a wide spectrum of subject areas/grade levels and CMS choices in CEP 820. For example, a 3rd grade teacher may be producing a notebook on how he created his unit in Moodle; an earth science teacher may be developing her course using Ning and so on.
GREAT, HOW DO I DO SOMETHING LIKE THIS IN MY COURSE?
Each online unit (or what I call “Chapter”) in CEP 820 consists of a Road Map, Lecture, Lab and Assignment. In the first chapter – we set the stage for the developer notebook by having students complete the following “lab”
Google Docs is an incredible collaboration and productivity tool.
This is the “anchor” tool in CEP 820. In each of our courses, we try to choose 1 technology to focus on — in this course, the majority of our written work will be facilitated through Google Docs. Of course we will experiment with lots of other technologies along the way, but we expect you to become highly proficient in the use of Google Docs for collaboration. Now, there are many alternatives to Google Docs that you should be aware of Zoho, Office Live, Buzzword, & Peepel (to name a few.) We have experimented with all of these tools and have chosen Google Docs because of its ease of access, usability and reliable infrastructure/backbone. (What is the site most people go to when troubleshooting web connections — Google. If Google is down, you know there is a problem!) Additionally, Google has made a concerted effort to connect with the educational community and has created a wealth of resources for the K-12 and higher-education worlds. This is not to say that the other tools do not have competitive advantages over one another, but we don’t want the technology to get in the way here. This course is about learning how to teaching online, not learning how to use every online productivity tool.
For those new to Google Docs, here is a brief introduction from the popular Common Craft “In Plain English” series:
This fall, MSU partnered with Google to offer Google apps through MSU’s secure network. What this does is allow students and faculty to share documents with fellow students and faculty more securely on MSU servers. Thus, you do not have to create an additional username and ID to access google docs! (If you do have an @gmail account, we ask that you use your @msu/Google Apps account for this course.)
There are 2 steps to this lab: Learning and DoingStep 1: The Learning Part
There are several tutorials available if you are unfamiliar with the ins and outs of Google Docs. We have a wide range of experience in this class, from novice to expert. One advantage to learning and teaching online is that we have an extraordinary amount of leverage in delivering technical support to you. There is a basic level of understanding that you need to complete the assignments. As a college, we have a subscription to Atomic Learning. This is an EXCELLENT resource for step-by-step tutorials to give a basic understanding of the capability of software.
For this lab (and the course) we expect that you understand all of the information contained in the following tutorials:
Now, if you already know Google Docs very well, you can go above and beyond the requirements by exploring these advanced tutorials on the Google Docs Community channel on YouTube. If you’re still getting your feet wet, you can bookmark the channel and save it for later!
Step 2: The Doing Part
We are going to use a Google Spreadsheet to help track your progress this semester. Actually, it’s beneficial for you AND for instructors. It gives you a clear idea of due dates for the “big” assignments in the course and helps us, at a glance, see how you are progressing. One of the first questions I always get when showing the assignment tracker is “what if someone goes in and deletes all of the data?” As you learned in the tutorials, there is a handy “view revision history” feature that lets us see who has made changes to the document (we also have set notifications for the edits!) No grades are every displayed on the spreadsheet, it’s just a nice, clear way of seeing assignments and due dates throughout the semester.
In the brief video below, we give you an introduction to the Assignment Tracker.
We’ll give more information on the assignment tracker in Chapter 2 — for now…let’s get going on your tasks.
Task 1: Welcome to “The Assignment Tracker”
On Monday, January 18th, you received an invitation to “CEP 820 Assignment Tracker – Fall”
1. Accept the invitation
2. Enter your name in the spreadsheet under your assigned dorm using the following format:
Lastname, Firstname
You’ll know your dorm name by looking at the name of your dorm under “Lessons” in ANGEL.
Task 2: Share a Document
Create a Google document called yourlastname_notebook (of course, replace yourlastname with your last name i.e. wolf_notebook)
Share the document with:
<instructor/ta emails> – give us rights to edit.
That’s it! We’ll be doing much more during the next unit and you’ll be adding to the yourlastname_notebook document in your assignment for this chapter! (Which, as you can see on the spreadsheet, is due on February 1st.)
To summarizeFor this lab, you should have:
— completed all of the Atomic Learning Tutorials for Google Documents and Google Spreadsheets
— accepted the invitation to the “CEP 820 Spring 2010 Assignment Tracker” spreadsheet and added your name under your assigned dorm
— share a document called yourlastname_notebook with instructors using Google Documents
Once you have completed these Lab tasks, make sure to mark “done” in the “Intro Survey” Column on the Assignment Tracker
Ready for the next challenge? Let’s move on to the assignment
Next, the assignment
As you learned in the lab, the development of the notebook will be achieved using a shared Google Document. This will allow us to track your progress over the semester and provide feedback to you in one tidy learning space. During this course we asked you to leave your reservations on the virtual doorstep and for many, the following request may cause a bit of anxiety as the process of “formal writing” tends to conjure up tummy aches and grumbles. We are intentionally leaving a rubric out of this stage in the writing process for several reasons. First and foremost, we are in the first chapter of the course and you have not been exposed to enough theory and practice to write a paper on the potential pitfalls and praxis of online learning. There is no “right or wrong” in this notebook — the key is learning how to communicate. With that said, in the entry one stage, we need you to do some initial brainstorming for the development of your course — believe us, things will change as the semester moves along — it’s all part of the process!
• Grade Level:
• Subject:
• Particular Curricular Unit you are thinking of developing:
• What do you want your course to look like?
• What your ideas/thoughts/dreams for class interaction for both teacher and students?
• How do you think you will assess students?
• What are some of the social, ethical, legal, and human issues surrounding the participation in your online course?
If you wish, a good way to start, may be to copy and paste the questions above and write a few paragraphs under each one. Citations are not necessary. There is no proper order, let your questions, concerns & ideas flow! We will be providing detailed suggestions on the ideas you present. Our goal here is to help you become better communicators and to think through all the things that are involved in online course development. When we provide feedback & constructive criticism to you, we ask that you do not fear that you are “failing.” We want you to get the most you can out of this course!
BACK END TIPS
In Google Docs Create a folder to organize all the docs into an easily accessible area
As you saw in the lab above, we use Robin Dickson’s Google Spreadsheet “Assignment Tracker”to articulate expectations and check-in points. Setting specific check-in/due dates helps the iterative process of the writing and feedback reinforcing that this is a real-time, live, engaged writing process with and between student and instructor.
LESSONS LEARNED
In Fall 2009 this assignment was called a “Justification Paper” — the word “paper” put an extra layer of anxiety and expectation on to the students so this semester, I changed the assignment to a “notebook.” This twist more accurately represented the iterative nature of the assignment and I am hoping it will help to clarify the expectations and put more emphasis on the writing and revision process.
Last semester, for the final “paper” entry, I required the students to delete the progress they had made and summarize their thoughts into a short essay. I found it interesting that many students wanted to share a new document instead of making changes in the existing notebook. I tried to articulate that your work is never really “lost” with Google Docs due to the history and revision changes. This semester, we will integrate the history and revision changes more tightly into the writing process so students can see the power (and purpose) of the history revision feature.
From a time management perspective – it is fairly time intensive (we had 40 students last semester) – however, for me the investment paid off. From an organizational stand point was so much better than passing around .doc files, checking blog postings, or editing on a wiki. The “workflow” clicked perfectly and I look forward to editing and revising the assignment to make it even more meaningful and useful to students. From a pedagogical standpoint, students sincerely appreciated the frequent and detailed feedback throughout the writing process (as opposed to “final” feedback with no opportunity for revision.) Additionally, when the notebooks are finished they can easily be published, pdf’d or exported to Word for touching up and printing.
A BIG thanks to Laeeq Khan, Greg Casperson, and Anne Heintz who have helped with the development and teaching of CEP 820 during the fall and spring and to Dr. Robin Dickson for her innovative use of the Google Spreadsheet Assignment Tracker.
This semester has been quite a challenge – I have really pushed myself (in addition to my students) in CEP 820. Quick background – CEP 820: Teaching K12 Students Online is one of the required courses needed to receive the NP Endorsement from MSU. Additionally, the course can be taken as an elective for the MAED online program. The main culminating project in the course is the creation of a complete online course module. The creation of the module is scaffolded through the semester, students must evaluate and choose a CMS and they are highly encouraged to use content from their professional practice to create the online or hybrid course (or unit.)
I have been involved in educational technology for about 12 years now – based upon my past experience – one might categorize me as an expert (or at least highly proficient) in assisting with technology integration in cross curricular and multi-disciplinary educational settings. If you’re familiar with the TPACK model – I have the T and P down and I help people who have the “C” (subject matter expertise in science, special education, composition…etc.) Therefore, to give my students a rich, authentic assessment of their final projects, I wanted to connect them to people who had the “total package” (a play on t-pack.) In essence, people who had experience with online/hybrid course development (T), veteran teachers (P) and subject matter experts (C).
I am so lucky to have a large and diverse Personal Learning Network (PLN.) This network consists of professors, MAET alumni, PhD students, practicing teachers, online learning experts, and on and on. Back in November I sent out an innocuous email to a cohort of people in my PLN. <Here is the text of the invite> In short, I was asking friends and colleagues to access a student course and use Jing + Screencast.com (both free tools) to record their reactions, feedback and suggestions for improvement. I specifically targeted people in my network who I thought would match well with my current students.
I was able to collect 16 brave souls willing to participate in the experiment. I sincerely want to thank the following for giving the gift of their precious time to assist in this experiment:
Now that I had my reviewers in place the next task was to gather the details for 40 student courses and send them on to the external reviewers in individual emails. I had been giving feedback on the development of the online modules all the way through, so I was very familiar with the content, I also know my PLN very well, so I did my best to match content area experts with content area experts, created a “form email” <see it here> and shipped each reviewer 2 modules to evaluate.
Keep in mind, that we were not working on any prior use model or case study — this was a new venture for everyone involved. I did my best to mediate the fear and trepidation on the student and reviewer side – putting forth the brave front – knowing that this would somehow work out. It could not fail with such a talented and adventurous group of both students and colleagues!
By now I’m sure you’re interested in seeing what actually happened — Here are a few highlights (links open in new windows, make sure your audio is up!):
I am risking the fact that I may be relying too heavily on my PLN. At the end of the semester, something like this is the icing on the stress cake. I purposely timed the submission of the final project 4 weeks before the official end of the semester to try and alleviate some of this stress.
This was incredibly tedious to manage. I wish I could have figured out a way to make the revier/reviewee process a little more automatic, but it was all done manually. This required minute attention to detail, making sure the right hyperlinks were going to the right people and making sure no one fell through the cracks. With everyone using different course management systems, keeping track of all the access points was a bit of a challenge.
Not everyone turned in their assignment on time. I’m an understanding instructor and I know things happen (all of my students are working adults, many carrying 2 or more courses plus a full time job) – but it is not fair to the external reviewers to send them late reviews (as they too have full plates.) Laeeq (my teaching assistant), Jess Knott (who graciously volunteered) and I conducted any of the late submission reviews.
I was not able to match everyone up with the “perfect” person — I had to stretch a bit when it came to content experts. (All of my reviewers were expert in online/hybrid course creation and pedagogy.)
The upsides –
I have connected my students to AMAZING people
My network was able to experience an alternative form of assessment in a “low-risk” setting. Low-risk in the sense that they could try this out with the 820 students. (We took on the high-risk!)
The external reviewers expressed appreciation in learning how to use screencasting as a form of assessment/evaluation.
If I do this again…
I will be more explicit with my reviewers and give them some tips on microphone and recording techniques. (I have a degree in audio production…I can’t help but be picky about production value!) I provided this support structure to the students (screencasting was one of the technologies we focused on during the semester) – it’s only fair I do this for reviewers as well!
I will only ask external reviewers to perform one review
I will try to adjust the final project due date one week earlier to avoid the end of semester crunch.
Help me continue the evaluation of the experiment…
There is so much more to talk about! With the evidence presented — I need to hear from the reviewers and students. I am on the fence about doing this again next semester (leaning more towards doing it again, I thought it was quite successful…but I am wavering a bit.) CEP 820 students, was this a valuable experience for you? Evaluators, was this too much to ask? Others, are you intrigued to try this – or have you tried this and do you have tips to share, ways I can improve the process? Do you want to be on the reviewer list next semester!?
Tomorrow, I’ll be presenting at the “Explorations in Instructional Technology” brown bag seminar series at MSU. My presentation is called “Adding a FlipCam to Your Technology Toolbox (for Online and Offline Instruction).”
First we will explore some resources for using the flip:
Next, is this brief video from Flip showing you some techniques for getting the best video from your camera:
How do I use the Flip? In my online courses I frequently send my students a “video voicemail” to check in and increase a sense of instructor presence for the students. Sometimes I use my iSight, other times I make a screencast with Jing and other times I use the Flip! Last semester I did quite a bit of travel while I was teaching and the Flip came in really handy! (Here is an example of one from my CEP 815 course last semester: http://bit.ly/aq3lS)
In my summer teaching, we focus on the use of video in teaching — the Flip cams are a great way of introducing video and video production. The ease of use allows us to focus on story boarding, lighting, without worrying about editing or some of the more advanced video techniques – that comes later once students are more focused on the goal (rather than the tool!)
The best way to show the power of the FlipCam is to participate in a QuickFire!
FilpCam QuickFire Challenge
Step 1:
I will put you in groups and hand your group a secret topic. (The secret topic can be ANYTHING, a math problem, case study, foreign language scenario, be creative, you can do this with any discipline!)
Step 2:
Then I will hand out your storyboard paper. Each scene should run 10 seconds. (Here is a storyboard you can use – http://bit.ly/1uKliQ – you can change the number of scenes and length depending on how much time you have.) You have 10 minutes to complete this task.
Step 3:
Take your group storyboard and pass it to the group on your left. (This highlights the importance of communication and storyboarding.)
Step 4:
Now, you must execute the storyboard you were given. Record each scene (in sequence) You have 10 minutes to complete this task.
Step 5:
If your students have laptops, have them stitch the 3 scenes together – if not, have them turn the Flip into the instructor.
Step 6:
Watch the creations!
UPDATE 9/18/09 2PM
A big thank you to all who came to the session this afternoon! I sincerely appreciate your willingness to “get your hands dirty” and try out the QuickFire — I hope you enjoyed the activity and that it spurred ideas on how you can use the Flip in your own practice.
A few things —
http://drop.io – a lightweight easy to use site for file/video sharing and commenting/feedback. Can be made private.
I think that answers the main questions — please do not hesitate to email or comment below if you have further questions or ideas on how to use the Flip!!

 #1 – Use personal videos


")


