
A few weeks back, Scott and I were talking about our 2012 garden plans. We have an amazing tomato lady – Karen, the proprietor of Michigan Heirlooms. Scott, who tends to the garden all summer when I’m away, emailed the tomato lady and sent her some pictures I took of the tomatoes we purchased from her greenhouse to share his excitement for the coming season. She loved the pictures so much she wanted to use them on her website! Being the Creative Commons girl I am, I was more than thrilled and honored she wanted to use my photos. I was even more thrilled when she offered to provide us with lettuce and peppers in exchange for pictures of them for this growing season – what a fun project! The project started tonight by planting the starters – 31 different varieties of lettuce! These certainly are not the best pictures ever, and more of a memory tool for me as they start to grow – but – I wanted to capture their growth over time. I’m not sure what I’m envisioning for the final photos (I have some fun creative ideas in mind.) I’m excited to plant the peppers tomorrow and for this exciting creative journey ahead. I’ve been so busy I haven’t had much time for “real” photographs lately, so this will force me to take time and see the beauty in the things growing around me.
Category: Food and Drink
Dublin Eats

This is a long overdue list of some of the favourite foodie places I visited in Dublin this past February. I’m looking forward to returning and expanding my list during the month of July! I would LOVE input from others and locals – there will be over 60 of us adventurers converging upon Dublin this summer and we will be looking for places to eat and imbibe.
Pubs:
Guinness Storehouse – http://www.guinness-storehouse.com/en/Index.aspx
We skipped the tour and went straight up to the Gravity Bar, best view in Dublin!
Temple Bar – http://www.thetemplebarpub.com/
Wonderful music, and a great cheese plate.
Stags Head –http://www.yelp.com/biz/the-stags-head-dublin
Another “must see” pub.
Messrs Maguire – http://www.messrsmaguire.ie/
The only brewpub in Dublin. Very good beer and great seafood chowder.
Restaurants:
Queen of Tarts – http://www.queenoftarts.ie/
WONDERFUL place for breakfast or lunch!
I didn’t get to try these restaurants, but I’m looking forward to trying them out this summer:
Diwali Indian and Nepalese – http://www.diwali.ie/
Rustic Stone – Raw, organic, vegetarian- http://rusticstone.ie/
The Exchequer – gastropub – http://theexchequer.ie/
Ukiyo Bar – bento and sushi – http://www.ukiyobar.com/
The Cedar Tree – Lebanese – http://www.yelp.com/biz/the-cedar-tree-lucan
Cornucopia – Whole Food and Vegetarian – http://www.cornucopia.ie/
Grocery & Markets:
Fallon & Byrne – http://www.fallonandbyrne.com/
Very high end grocery store – great cheese selection. They also have cozy a wine bar in the basement.
Markets: http://www.visitdublin.com/see_and_do/Shopping/Dublin_Markets
I did not have time to visit the markets during my February visit, can’t wait to check all of these out this summer!
My next post will list things to see and do….stay tuned!
6 Easy Steps for Making a Cooking Show with Kids
I have been making cooking videos with my nieces and nephew for a few years now. After I posted our latest cooking show, a few friends posted that they too wanted to make a show too, so I thought I would lay out a few helpful pointers.
#1 HAVE FUN
Do not stress out. This is not easy if you’re a high stress person, rolling with the messes & spills is part of the fun.
Now, I’m an auntie doing this – I know if you’re thinking about doing this with your own kids that it can add another layer of stress. They may not be as excited and may certainly act differently. Get them pumped up – show them one of the videos here to see other kids doing it. Have the kids make their favorite recipe, or a favorite recipe of a grandparent, friend, etc. (The videos & resulting cookies make great gifts for grandparents!)
#2 GATHER THE (TECH) EQUIPMENT
I use the following to film the videos:
Tripod
Flip Cam
iMovie
You of course can use whatever you want to film and edit – Windows Movie Maker, Final Cut Pro, Adobe Premiere, etc. If you’re using a Flip it comes with really easy to use editing and “stitching” software..we’ll talk more about editing in a bit.
#3 SET THE STAGE AND GATHER THE (COOKING) EQUIPMENT
Get your kitchen set up so the kids have a clean workspace. You may be lucky enough to have an island, or you could set up a card table. Make sure you have decent light in your kitchen. If you can, filming in the day, next to an open window will ensure good lighting.
If you’re working with younger kids, it is be helpful to measure and set out the ingredients (just like they do on real cooking shows!) Of course, as kids get older, measuring is also part of the fun and an added life skill.
#4 RECORD THE SHOW
With my nieces and nephews, I usually give them a prompt of what to say, they practice, then we record. As they have grown up and have started to read, we make cue cards and even write a script. Once the kids get in the flow of things, they naturally start to ad-lib and the fun begins.
To make the editing process easier, I record in quick little chunks for each part of the recipe. If you leave the recording going, editing becomes a bit more of a chore. Between breaks we clean up and talk about the next scene.
I do my best not to talk on the tape at all (though, sometimes they ask me questions that are “clip worthy” and they make the final cut.)
#5 EDIT
With roots in radio and tv production, this is the fun part for me – and usually the most frustrating part for others. Don’t be afraid to cut parts that are boring! Keep it snappy – a 2 minute 30 second clip is what I try to shoot for – but with cooking shows, they usually end up being about 5 minute segments. Having a nicely edited video is what will set your clip apart from others and will make the experience so much more enjoyable for your family & friends viewing the clip!
As I mentioned earlier, Flip comes with pretty handy easy-to-use software for newbies to editing. You can always Google “how to edit video with <insert what you’re using here>” for tips and tricks.
#6 POST
Share! That’s the reason for making the video – parents, grandparents, family and friends love to see the kids!! There are many popular venues for sharing like Facebook and YouTube. My favorite video hosting site is Vimeo.
That’s it!
If you found this helpful and make your own cooking show, please share it with me! I know my nieces and nephew would love to see other kids around the world cooking and it would get them psyched up for our next show.
Here are a few more of our fun videos:
#bakefest2011 a recap
Blame it on 7 years of built up PhD stress…but this weekend I went a little nuts in the kitchen.
My #bakefest2011 started with Martha’s Cookie App and Epicurious on the iPad. Say what you want about Martha Stewart – but her cookie app is spectacular, gorgeous & intuitive. While there is a handy shopping list embedded in the app, sometimes I still like to go old school.
Then I started Saturday prepping Santa’s Whiskers and the dough for the gingerbread men and speculaas. I then whipped up a quick batch of M&M sugar cookies (requested by @ryanschram)

I woke up this morning and baked off the Santa’s Whiskers. They’re fabulous and I’m definitely adding these to my repertoire.

Next, I rolled out and baked off the gingerbread men. The last time I made gingerbread men (December 2005) I swore I would not make them again. Not sure what got into me…but I forgot how horrible it is and assume it will be another 6 (maybe even 10) years before I try it again.

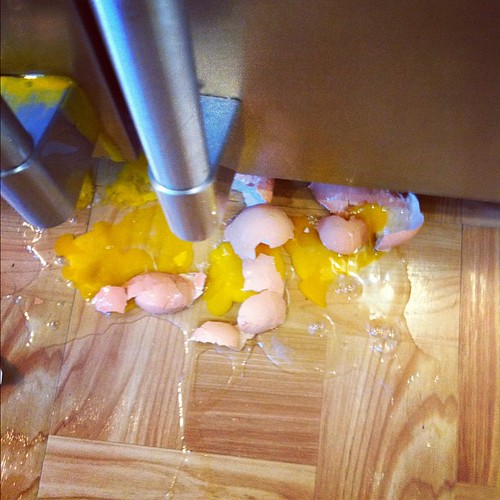
I then pulled out the Speculaas dough – FAIL. It was un-rollable. Moving on! Started cracking eggs for the next rounds and came upon a bit of good luck!

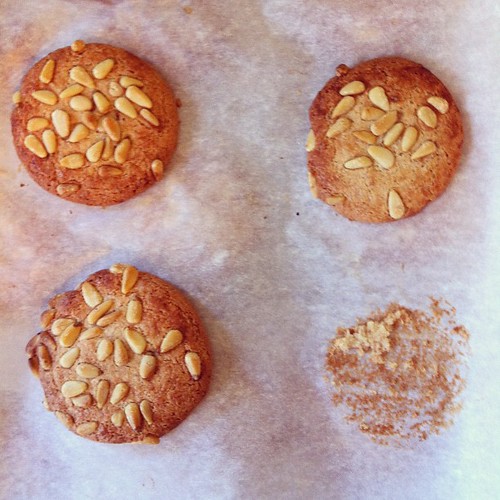
Next up were the Pignoli. I learned how to make them at Zingerman’s a few weeks ago. They were not exactly the same as they were when I made them at Zingerman’s…I think there was too much egg white and honey…but they turned out OK. (Not great, just ok.)
Next, things took a turn for the worse….
I decided to stop baking for a while and moved to chocolate. I made chocolate dipped pretzels (super easy!)

Then I made hazelnut chocolate bars. These too were super easy – melt chocolate, pour into mold, set outside! Though, they were not easy to cut into squares :( Next time I will heat my knife under hot water then attempt to cut the pieces out.
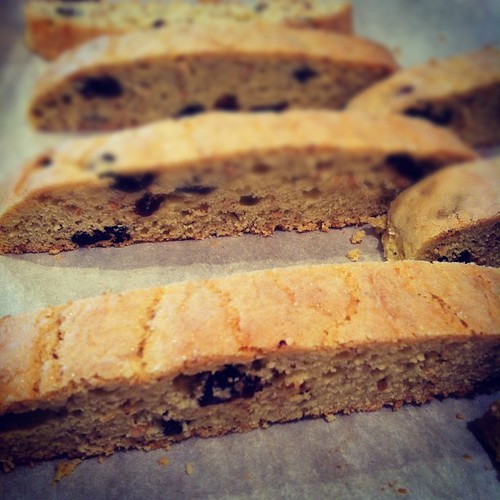
I built the courage back up to continue baking. I made another Zingerman’s recipe – Cherry Sesame Biscotti. These have become my daily breakfast for the past month! They’re SO GOOD and so easy!!
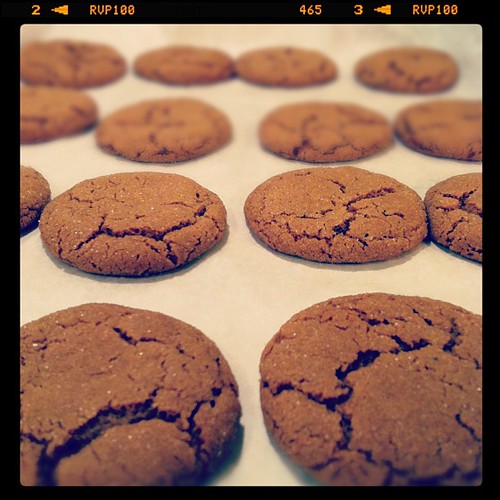
Then, it was onto more ginger-y goodness. Scott really likes gingerbread, so I thought he would enjoy Jenn’s grandma’s Gingersnaps. They’re a ton easier than gingerbread, and I think they taste better! Thanks Jenn and Gramma Edna.
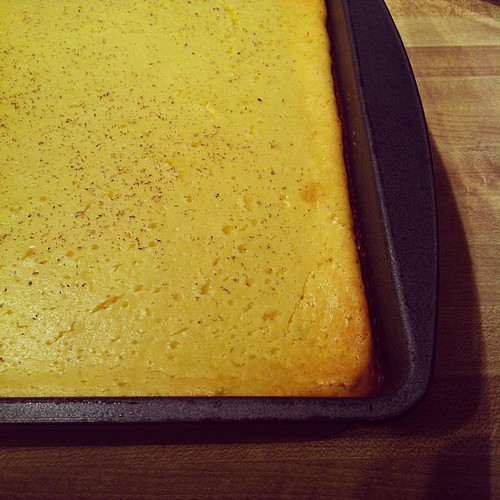
FINALLY I round out the evening with these Eggnogg Bars from Martha Stewart. They’re a special treat for our MAET instructor luncheon on Tuesday. They take a day or two to set up in the fridge.
AAAANNNNNDDD….done. Though after this weekend’s adventures I’m not sure how much more baking I’ll do this holiday season :) Looking forward to sharing the fruits of my labor this week with my friends and colleagues!
I got by with a little help from Rachael Ray
disclaimer: yep, I post and tweet about food and I’m not going to feel bad about it. I’ve been taking pictures and blogging about food since 2004 before Twitter even existed!
The past few months have been ridiculously busy and we have been caught in the (take a deep breath, run on sentence coming) get home not sure what to eat order crappy take-out or let’s go out real quick and spend way too much money on food we can make better at home rut.
The challenge with cooking at home is that it takes a little bit of planning and I’ve been completely wiped out. One more thing to plan would cause a) cognitive overload and b) a meltdown. As I was running errands on Saturday I opened up the latest issue of Everyday with Rachael Ray at the grocery store. Poor Rachael gets a bad rap sometimes, but, in her defense I’ve never cooked a bad meal from her recipes. As I was flipping through, I ran across her Weeknight Meal Planner. It had a list of what to buy for the week, all the selections looked pretty darn good and the whole cost was less than $40 (for two of us.) I didn’t have to think about a thing!
I started the week on Sunday (since we usually like to go out with friends on Friday.) Short of having Rachael come over and cook the stuff herself, it was an awesome experience! Every day when I got home I didn’t have to think much and had dinner on the table in 20-30 minutes. For the first time in a long time I used up every single thing I purchased and physically feel SO MUCH better because I know exactly what I’m eating and where it comes from. I even learned a few new tricks – I had never thought about grilling sweet potatoes or avocados before, they were excellent!
(On a side note, I love Bittman’s How to Cook Everything app, and he also has shopping lists with his recipes, however, it doesn’t give a weekly list w/running themes so I can use everything up.)
So, I just wanted to say thanks Rach – you were a much needed guide on the side to help me get back on track!
BBCC – Black Bean Chorizo Chili

It’s the perfect day to stay inside and watch football playoffs (or write your dissertation.) So to warm up my fingers, I thought I would synergize multidisciplinary dialogue and share my chili recipe for this Sunday. It’s a new one, inspired by Scott’s request for a chili with “a lot of beans.”
BBCC – Black Bean Chorizo Chili
1 lb of fresh chorizo
1 small onion chopped
2 pieces of bacon (most of the fat cut off – not that’s saving that many calories…)
1 habanero chili
4 cans of back beans (I like Eden Organic)
1 can Ro*Tel tomatoes with habanero
1 can Muir Glen fire roasted tomatoes w/green chilies
handful of chocolate chips
cilantro (I like a lot)
Spice Mix
chile powder
cumin
cayenne
cinnamon (just a dash)
Render bacon in bottom of large heavy pot (I use my LeCreuset dutch oven.) Add onions and stir until they start to soften. Add chorizo and stir until almost cooked through. Add everything else to the pot and let it bubble over low heat for a few hours.
If you’re not a huge spice person, you can add a bit of sour cream to tame the heat (I’m not a big sour cream fan) or you can skip the whole habanero chili.
Enjoy!
Go Green, Go White Chicken Chili

1 1/2 pounds of ground chicken breast (you can also use one inch cubes of whole breast pieces)
2 links of andouille sausage cut into half moons
secret mix of chili spices :) (the secret is to get the spices from http://www.worldspice.com – cumin, chili powder, habanero…I can’t give away all my secrets!)
1 large poblano chile roasted, peeled and chopped
3 jars of beans (habichuela blanca, cannellini, navy)
2 jars of chopped fire roasted tomatoes with green chili
1 jar of salsa verde (or if you have time, make your own salsa verde)
1 dash of Michigan vodka (optional)
2 tomatillos
You can scale up or down depending on crowd – it’s not an exact science.
In large dutch oven or soup pot, saute chicken w/the spices until cooked through
Add sausage, stir
add salsa verde
add beans
add tomatoes
add poblano
add jalapeno
add dash of vodka
let cook over medium heat for an hour or so. Alternatively, you can dump the contents of the pot in the crock pot and let it stew for a few hours.
right before serving, cut up tomatillos and mix into chili
Enjoy!
Mother’s Day Brunch Menu
Main Courses
Yeasted Waffles
with Michigan Maple Syrup. Homemade Raspberry or Blueberry Freezer Jam (fruit from MSU Student Organic Farm) and Caulder’s Dairy Whipped Cream
Breakfast Casserole
Challah, Eggs from Aunt Betsy’s Chicken Farm, Sausage, Potato and MSU Dairy Store Sharp Cheddar cheese
Grilled Salmon
Fresh Canadian Salmon marinated in soy, ginger, honey, lemongrass, cilantro, and chili
Salad
Michigan Cherries, toasted hazelnuts, carrots, Wisconsin cheddar and apples
Dessert
Key Lime Pie
from Sweet and Savory Bakery
Lemon Curd Pound Cake
from Sweet and Savory Bakery. Served with Strawberries and Calder’s Dairy whipped cream
Snack Break! Waffles for one?
 So, while I should be blogging about my dissertation or teaching related things, I’m slightly stressed and thought it would be a good time for a snack break!
With the aid of some saved up gift cards, a few weeks ago I purchased my first ever waffle-iron. I did my research (Cook’s Illustrated, Alton Brown, Amazon reviews, etc.) and finally decided I had to have the Cadillac of waffle irons — the All-Clad 4-square Belgian Waffle Maker. (Did I mention I had gift cards?) This purchase and sudden interest in waffles was inspired by the inventive Waffelizer blog. After coming across the blog a few months ago, I decided to make waffles (or things waffled) predominately featured on the Fall 2010 tailgate menus. With summer teaching around the corner, final grades due this week, and a dissertation cloud over my head, I could not imagine a better time to immerse myself in a new hobby. (Do I even have to say insert sarcasm here?)
Long story short, my first attempt at waffles went pretty well. I had planned on making waffles for dinner this past Sunday night after running the exciting Heart of a Spartan 5K in the morning. Now, I don’t think waffles for dinner is bizarre, but, my husband disagreed and did not express a desire to partake in the fruits (breads?) of my waffling. So I went a googling for a “waffles for one” recipe. (I didn’t have any wax paper or ziplocs for freezing and I just wanted to make 2 waffles.)
I was disappointed with my google search — had no one perfected the waffle for one? So, I decided it would be a great time to experiment — and here is what I came up with! (It was successful if I do say so myself!)
Waffles for One
Perfectly portioned to fill one side of the All-Clad 4-square Belgian Waffle Maker.
Dry Ingredients:
1/3 cup organic flour (or, play around and get up to a 1/3 of a cup of different flours, whole wheat, etc.)
pinch of salt
3/4 tsp baking powder
1 tsp sugar
1 tsp cinnamon
Wet Ingredients
1/2 egg
1/4 c buttermilk (or regular milk if you don’t have buttermilk on hand)
1 tbsp melted butter
dash of vanilla
Step 1: Put dry ingredients in small bowl and set aside
Step 2: Melt the butter and let it cool (but not re-coagulate)
Step 3: Crack egg and whisk it up, scoop out approx 1/2 of the egg (you can cook it up to go with your waffle!)
Step 4: Whisk buttermilk into egg, whisk in vanilla, whisk cooled butter into the mix.
Step 5: Mix wet and dry ingredients – give it a few nice stirs to make sure all ingredients are incorporated.
The waffle iron was set to 6 (out of 7.) I scooped out the contents bowl to fill the left side of the waffle maker. Set the lid down and once the escaping steam slowed down, lifted the lid. Looked nice and golden brown – but put the lid down for another few seconds (I like crisper waffles.)
And there you have it – two perfect waffles emerged from the Cadillac, I mean @allclad waffle iron. I drizzled with some local honey and enjoyed my waffles with no leftovers and only a few small bowls to clean up!
Now for extra credit you could mix in some ham and shredded cheddar to make it more savory and “dinner like.” You could mix in some berries for a sweet treat…the possibilities are endless (as you will quickly find out if you follow @waffleizer)
Enjoy – and let me know if you try out the recipe!
Why I love the web, the saga continues (aka @AllClad FTW)
 Punya and I always go back and forth about how much we love the web. Punya has his sci-po stories – and then there is the story of how Punya critiqued Cam Wilde’s periodic table of typefaces. If you read the comments, you will see Cam ended up being a guest speaker in our class this summer! (Check out the recording!) I love how the webs weave and connect us.
Well, now I have another story to add to the mix, and of course it has a cooking twist. A few weeks back, my foodie friend Kari emailed me distraught because she had a pretty bad caked-on baked-on burn on her shiny new All-Clad pan.
Kari emailed:
Hey–do you know how to get fried-on olive oil off stainless steel? I’ve tried baking soda and ketchup…. sigh.
I replied:
Bar Keeper’s Friend does a really nice job – http://www.barkeepersfriend.com/products.htm – you can get it usually at any grocery store or hardware store. Mix some into a paste and let it sit on the stain overnight – then get a scrubber and rub it off. SHOULD do the trick. In a pinch I have also used Mr. Clean Magic Erasers — I have no idea what is in those things, but dang, they really are MAGIC. I’ll tweet it out and see if I can get any other suggestions.
Of course, because I have an awesome network, the suggestions rolled in –
Via Facebook:
Bindu in Indonesia suggested – Look up Baking soda and its properties. It is supposed to be able to clean all.
Scott in Atlanta said – Ball up some aluminum foil, and scrape madly.
Brother-in-law Daryl said – We have something called dip-it and we get it from ecolab, this stuff takes everything off.
Twitter chimed in with
boil white vinegar and lemon slices (an inch or less). let sit til cool. use straight razor to peel stain. scrub w/baking soda. (via @trishlet)
Vinegar is my go-to cleaner and hasn’t failed yet. I fill with a mix of vin and h2o and boil for 20-30 min. Wipes right off.
and
a paste of vinegar and baking soda for really tough jobs. (Also great for cleaning clogged drains! VOLCANO!) (via @leynafaye)
THEN, the tweet that made me run across the hall and proclaim my love of the web to Punya.
Keep at it with Bar Keepers Friend and elbow grease! –– this tweet via, ALLCLAD. Yes, All-Clad, the maker of the pan! Color me ecstatic! Another company with their ear to the social media ground – and not in a spammy nasty auto-follow sort of way, in a genuine, how can I help sort of way. Of course, I immediately added @allclad as a friend and thanked them for the tweet.
I sent all the suggestions on to Kari and waited for the results of the experiment. The next day, another tweet showed up in my @ column –
Nice to tweet you :) Any news on your friend’s pan? (via @allclad)
They were checking back in! All-Clad, I commend you for “doing social media” the right way – you’re a #1 class act in my book. Thank you for adding to the conversation and serving as an excellent role model for tweeters everywhere!
Kari eloquently blogged about her stain removal experiment here – long story short – success the stain is gone!
I’m happy to chalk up another one in the WIN column for social media!